Linux操作系统配置服务器
1.配置主机名
规划好2台计算机Server01和Client01的主机名、IP地址
2.配置常规网络
首先虚拟机要与网络中其他主机进行网络通信,需要进行正确的网络配置
3.安装NFS服务器
4.启动nfs,设置防火墙
5.配置文件
6.测试NFS服务器性能
7.设置ssh免密登录
0 前言
架站需要很强的 Linux 基础概念以及基础网络知识,否则的话,当网络断断续续 的时候,您永远也不会知道是哪里出问题! 而当某个服务器软件出问题的时候,您永远也不晓得是发生了什么事情!老人家说『对症下药才有效』, 随便吃药是不可能『无病强身』的!因此,对于网络服务器来说最重要的基础档案权限、程序之启动关闭与管理、 Bash shell 之操作与 script 、使用者账号的管理等等,您都必须要具备最基础的认知才行,否则,服务器真的不好碰!
1 配置主机名
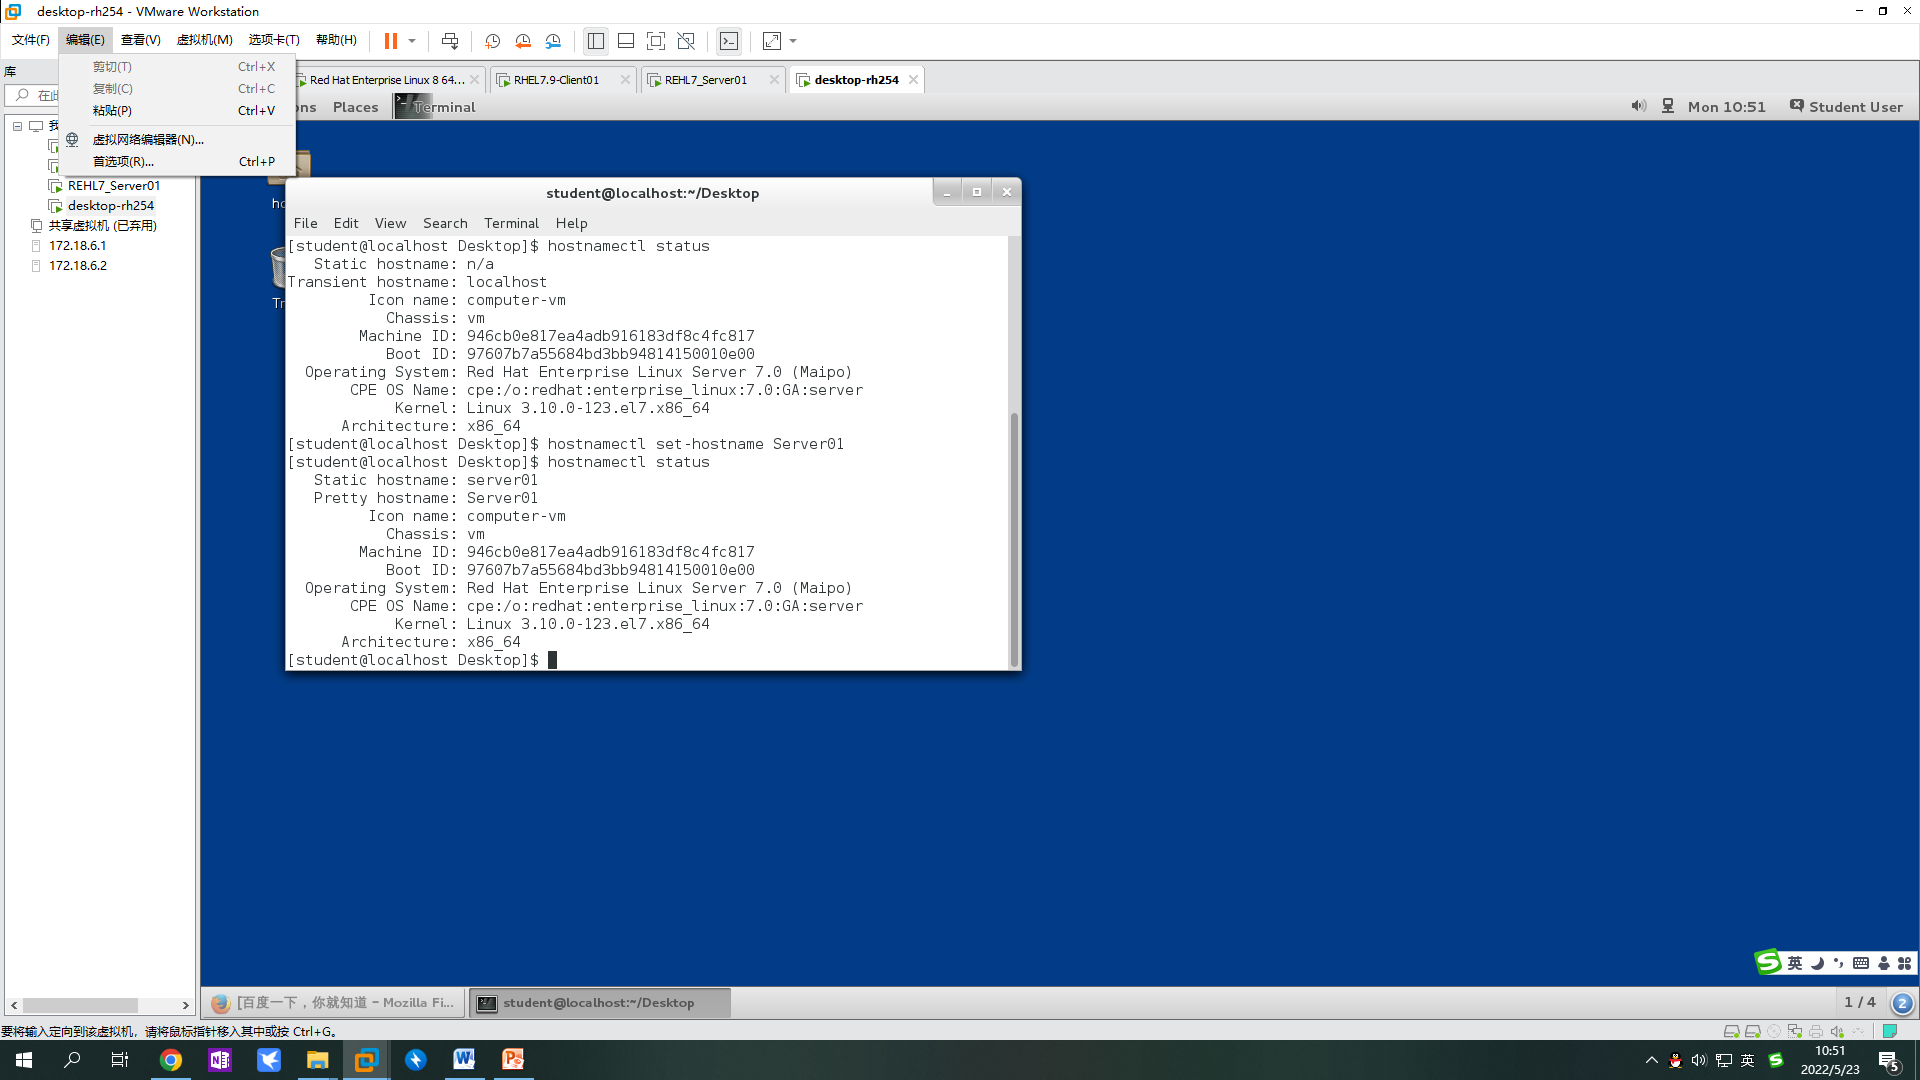
规划好2台计算机Server01和Client01的主机名、IP地址,这儿以Server01为例
可以通过umtui、hostnamectl等方式修改主机名
1)查看主机名
| [student@localhost Desktop]$ hostnamectl status Static hostname: n/a Transient hostname: localhost Icon name: computer-vm Chassis: vm Machine ID: 946cb0e817ea4adb916183df8c4fc817 Boot ID: 97607b7a55684bd3bb94814150010e00 Operating System: Red Hat Enterprise Linux Server 7.0 (Maipo) CPE OS Name: cpe:/o:redhat:enterprise_linux:7.0:GA:server Kernel: Linux 3.10.0-123.el7.x86_64 Architecture: x86_64 |
2)设置新的主机名
| [student@localhost Desktop]$ hostnamectl set-hostname Server01 [student@localhost Desktop]$ hostnamectl status Static hostname: server01 Pretty hostname: Server01 Icon name: computer-vm Chassis: vm Machine ID: 946cb0e817ea4adb916183df8c4fc817 Boot ID: 97607b7a55684bd3bb94814150010e00 Operating System: Red Hat Enterprise Linux Server 7.0 (Maipo) CPE OS Name: cpe:/o:redhat:enterprise_linux:7.0:GA:server Kernel: Linux 3.10.0-123.el7.x86_64 Architecture: x86_64 |
2 配置常规网络
1)首先在Vmware设置网络信息,菜单-编辑-虚拟网络编辑器
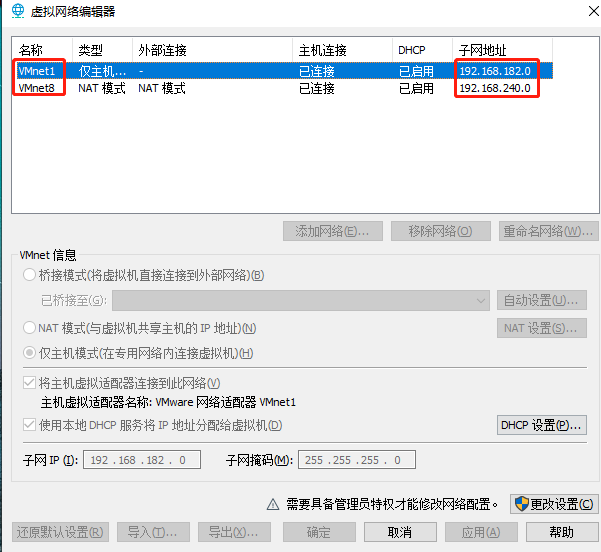
2)设置自己想要的网段,记住这个IP地址
3)设置网络
可以通过系统菜单、图形界面、nmcli等方式配置网络信息
设置虚拟机
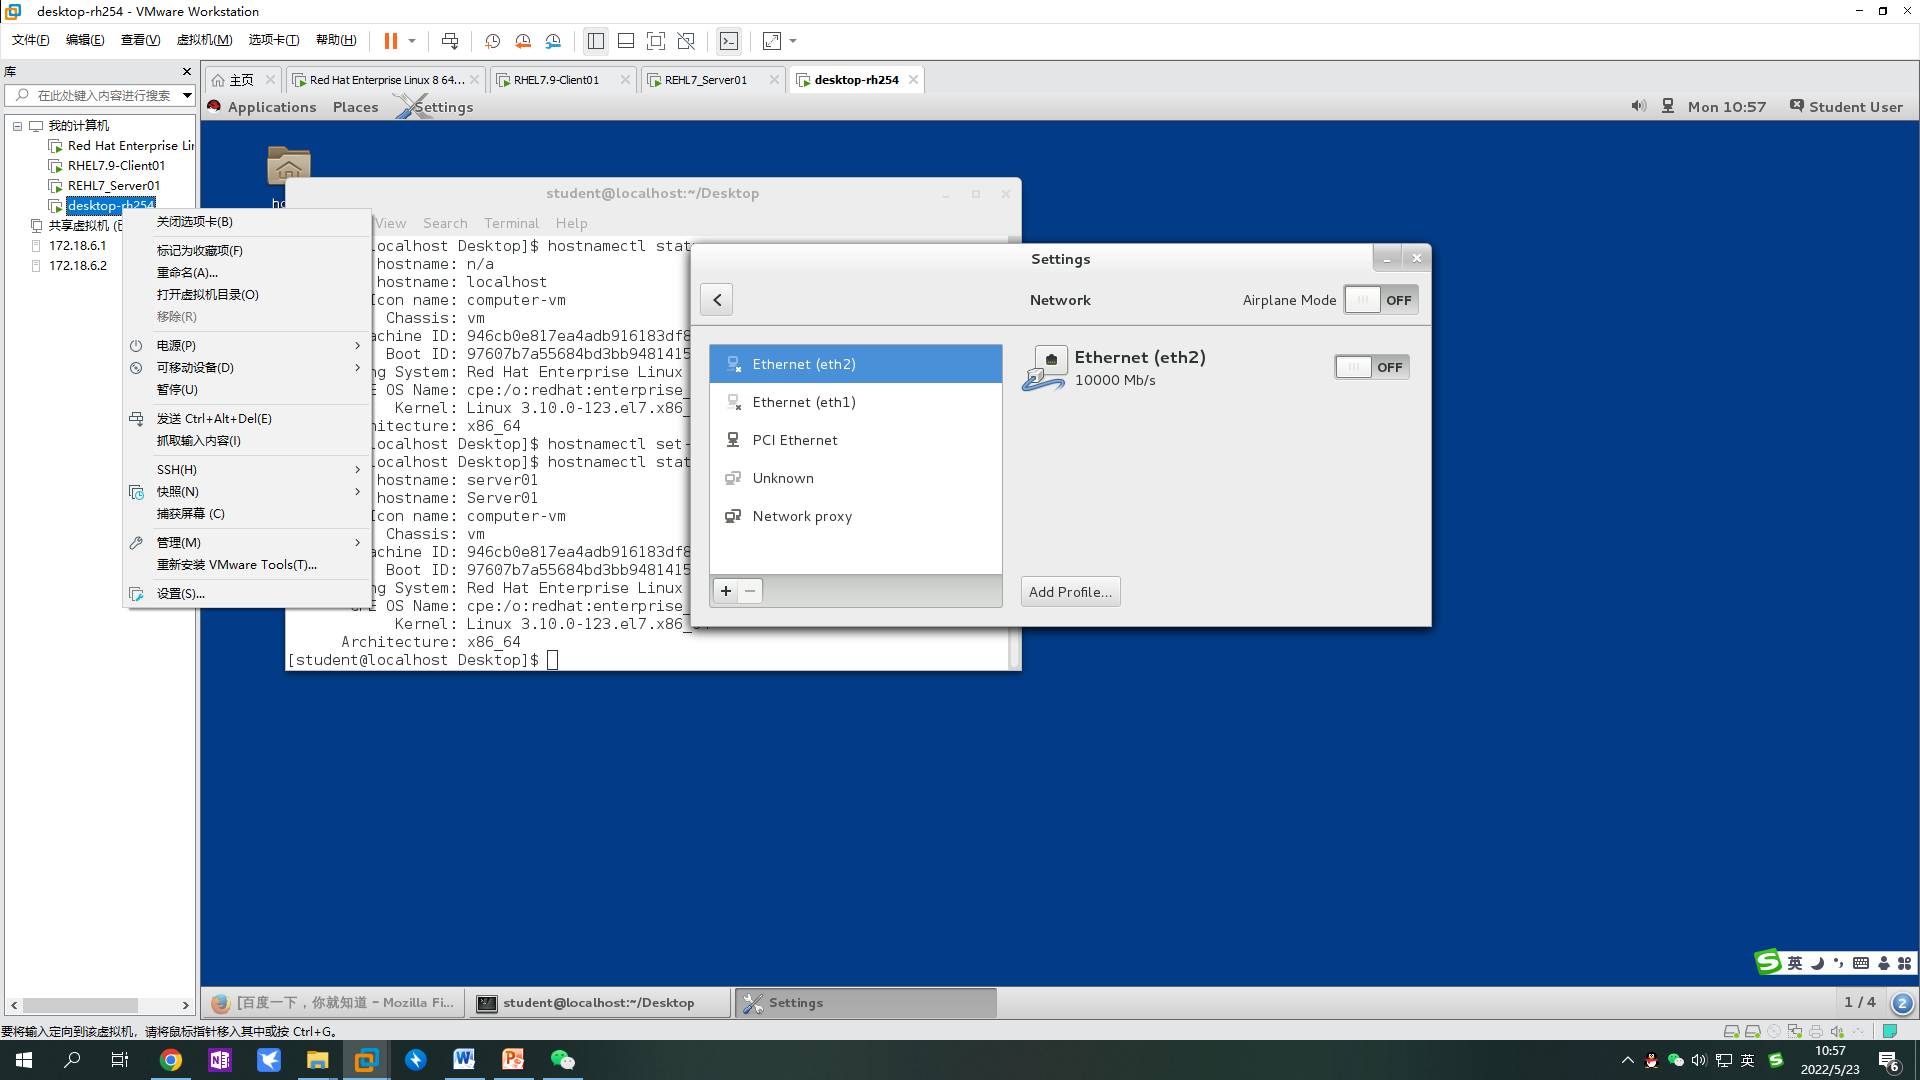
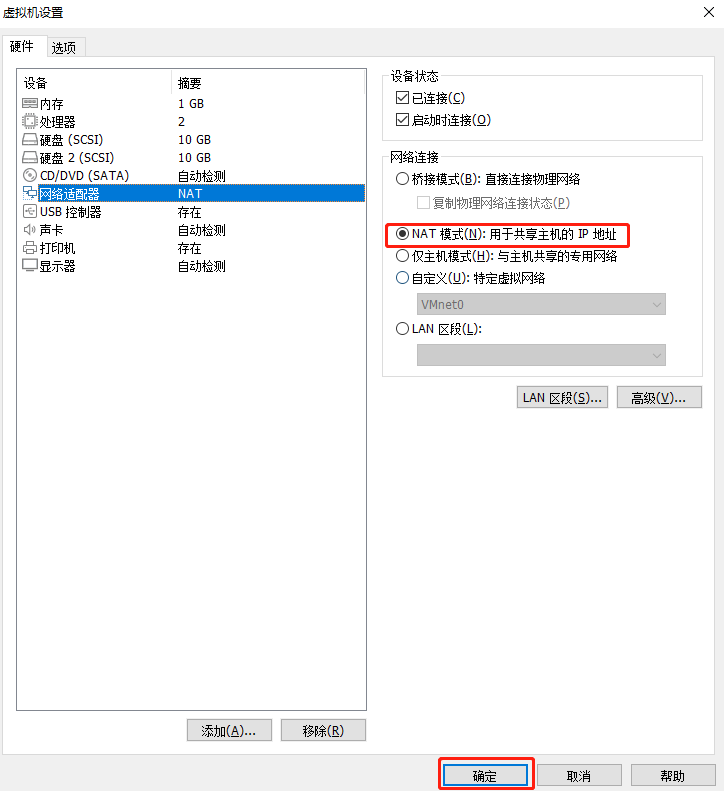
采用NAT模式,采用其他模式也可以,设置方法大同小异
在Linux系统中找到网络设置,选择一种有线连接方式
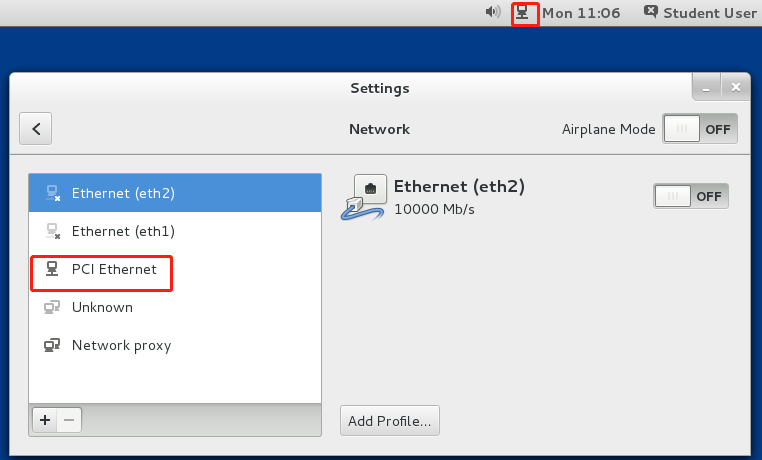
注意这儿的IP地址和刚刚Vmware虚拟网络地址是一致的
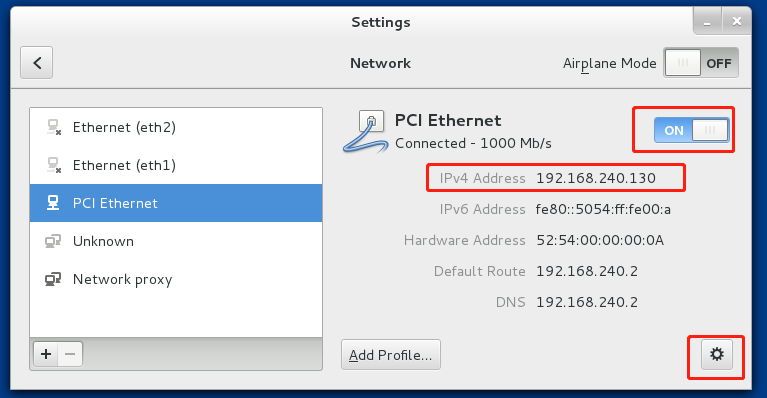
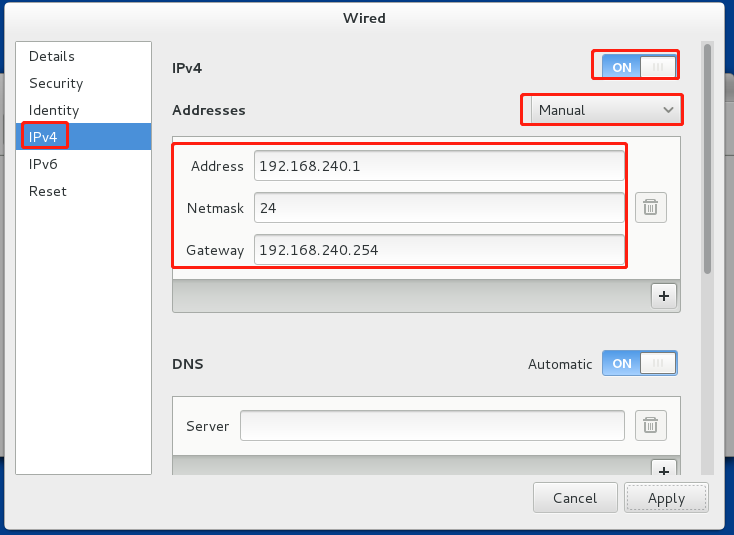
选择IPv4,手动设置IP地址。注意IP地址设置,每个学生的IP不同,需要和自己电脑IP匹配。服务器Server01设置IP地址 192.168.240.1,Client01设置为192.168.240.20
4)测试网络
测试主机是否可以连接外网
用ping命令
| [student@server01 Desktop]$ ping www.qq.com PING ins-r23tsuuf.ias.tencent-cloud.net (61.241.x.x) 56(84) bytes of data. 64 bytes from 61.241.x.x: icmp_seq=1 ttl=128 time=9.36 ms 64 bytes from 61.241.x.x: icmp_seq=2 ttl=128 time=9.22 ms 64 bytes from 61.241.x.x: icmp_seq=3 ttl=128 time=9.40 ms 64 bytes from 61.241.x.x: icmp_seq=4 ttl=128 time=12.6 ms 64 bytes from 61.241.x.x: icmp_seq=5 ttl=128 time=9.09 ms 64 bytes from 61.241.x.x: icmp_seq=6 ttl=128 time=9.22 ms 64 bytes from 61.241.x.x: icmp_seq=7 ttl=128 time=9.61 ms 64 bytes from 61.241.x.x: icmp_seq=8 ttl=128 time=9.56 ms 64 bytes from 61.241.x.x: icmp_seq=9 ttl=128 time=9.58 ms 64 bytes from 61.241.x.x: icmp_seq=10 ttl=128 time=10.7 ms 64 bytes from 61.241.x.x: icmp_seq=11 ttl=128 time=9.48 ms 64 bytes from 61.241.x.x: icmp_seq=12 ttl=128 time=17.0 ms |
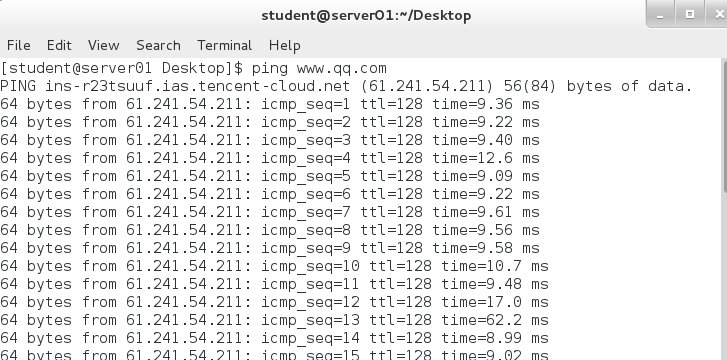
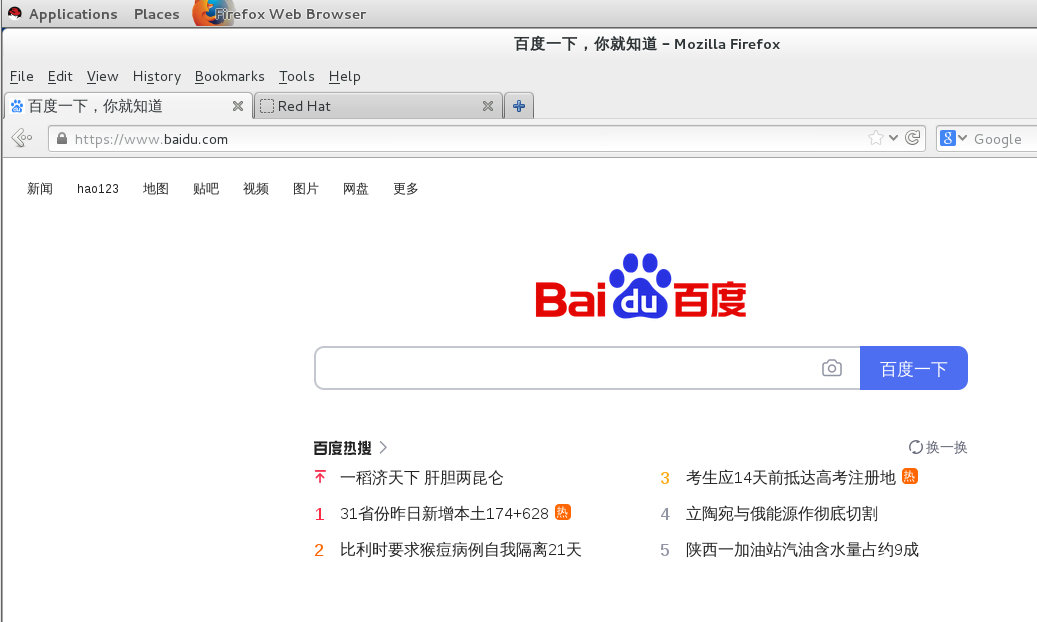
用自带浏览器登录网站测试
测试Client01与Server01是否可以连通
需要再复制一个虚拟机,需要在关机状态下进行
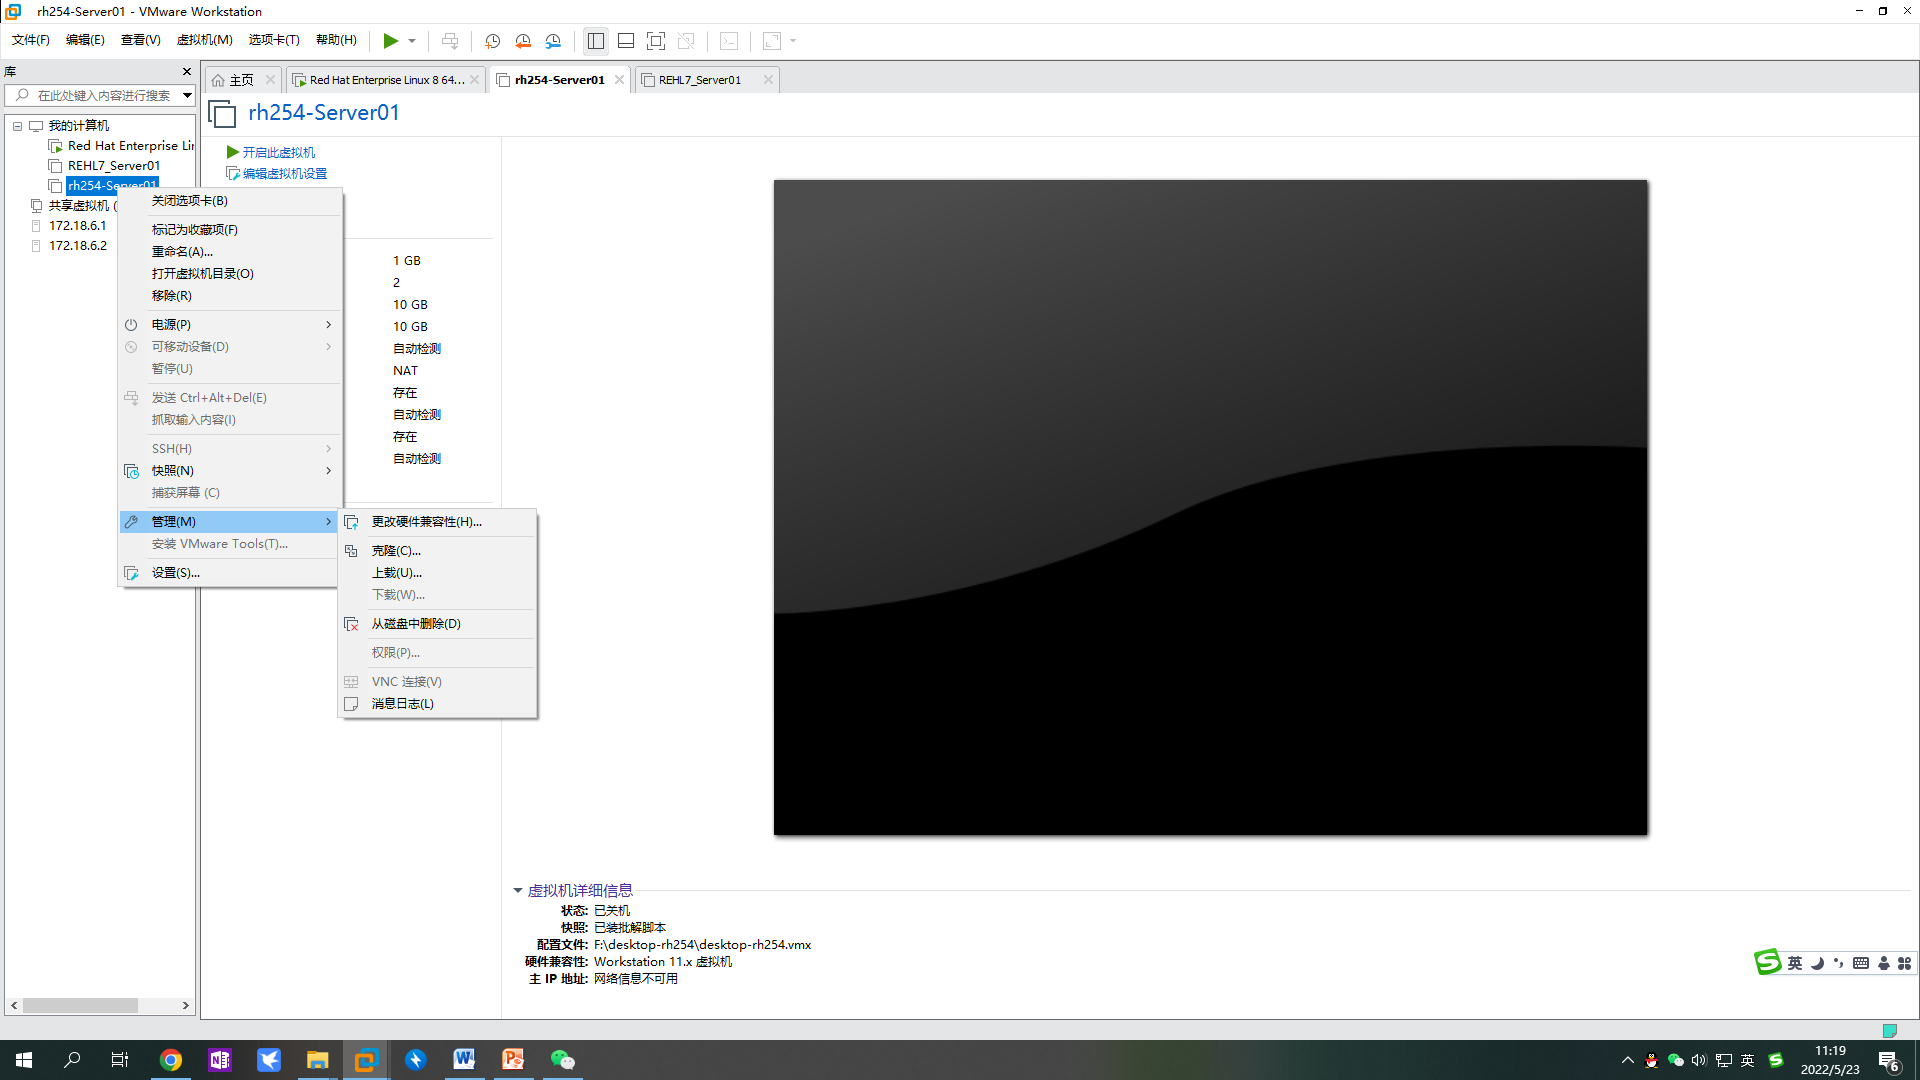
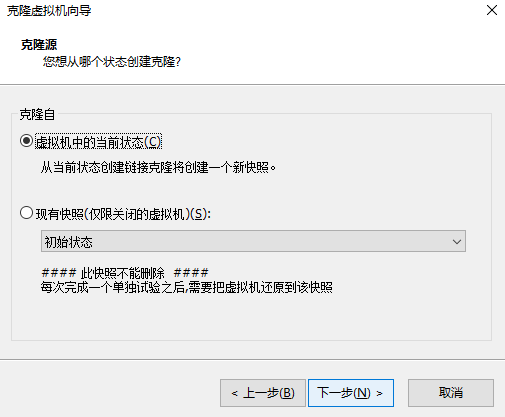
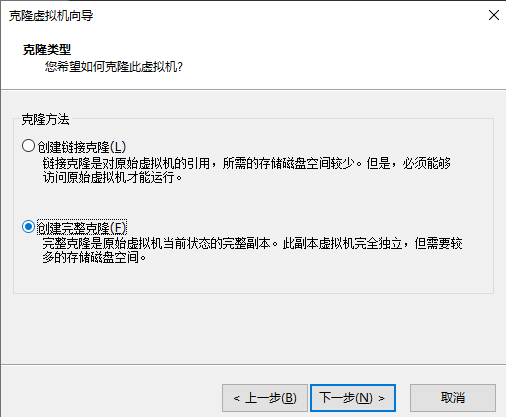
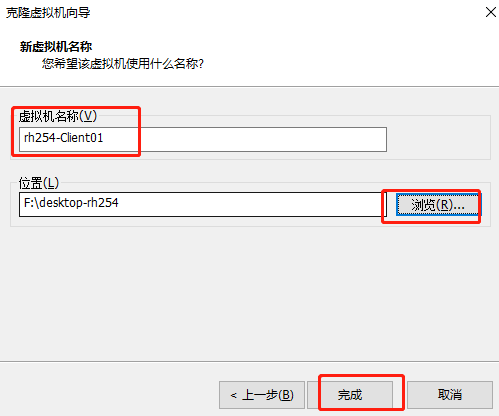
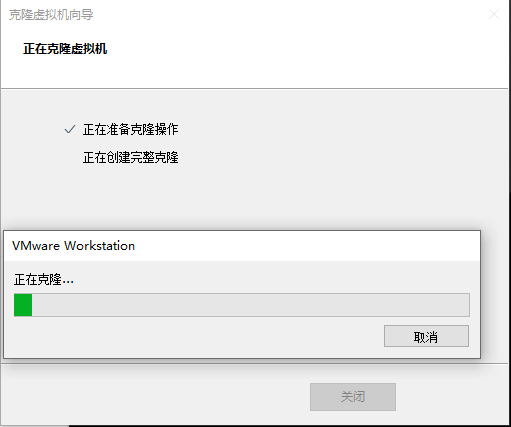
安装完成后,ip设置为20
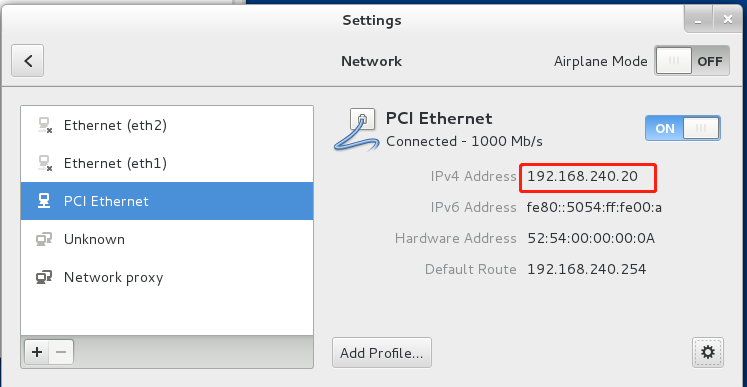
然后测试Client01的网络连接
测试与Server01的连通性
| [student@server01 Desktop]$ ping 192.168.240.1 PING 192.168.240.1 (192.168.240.1) 56(84) bytes of data. 64 bytes from 192.168.240.1: icmp_seq=1 ttl=128 time=0.339 ms 64 bytes from 192.168.240.1: icmp_seq=2 ttl=128 time=0.217 ms 64 bytes from 192.168.240.1: icmp_seq=3 ttl=128 time=0.277 ms 64 bytes from 192.168.240.1: icmp_seq=4 ttl=128 time=0.261 ms 64 bytes from 192.168.240.1: icmp_seq=5 ttl=128 time=0.228 ms 64 bytes from 192.168.240.1: icmp_seq=6 ttl=128 time=0.182 ms 64 bytes from 192.168.240.1: icmp_seq=7 ttl=128 time=0.268 ms 64 bytes from 192.168.240.1: icmp_seq=8 ttl=128 time=0.267 ms 64 bytes from 192.168.240.1: icmp_seq=9 ttl=128 time=0.278 ms 64 bytes from 192.168.240.1: icmp_seq=10 ttl=128 time=0.302 ms 64 bytes from 192.168.240.1: icmp_seq=11 ttl=128 time=0.289 ms 64 bytes from 192.168.240.1: icmp_seq=12 ttl=128 time=0.288 ms 64 bytes from 192.168.240.1: icmp_seq=13 ttl=128 time=0.216 ms 64 bytes from 192.168.240.1: icmp_seq=14 ttl=128 time=0.238 ms |
| 主机名 | 操作系统 | IP地址 | 网络连接方式 | IP设置方式 |
|---|---|---|---|---|
| Server01 | RHEL7 | 192.168.240.128 | VMnet8(NAT) | DHCP |
| Client01 | RHEL7 | 192.168.240.131 | VMnet8(NAT) | DHCP |
如果网络连接失败,
1.可以直接成类似主机的IP地址
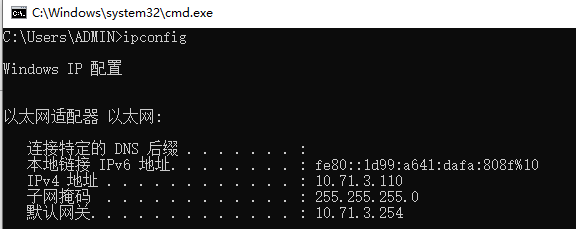
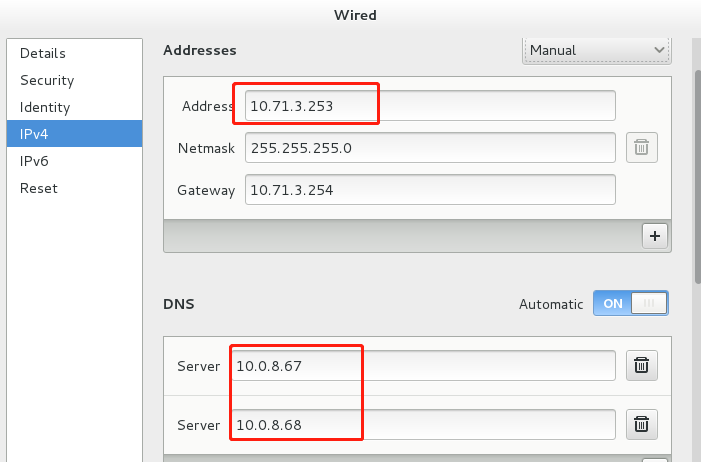
虚拟主机和主机IP同一字段,正常连网
| [student@server01 Desktop]$ route -n Kernel IP routing table Destination Gateway Genmask Flags Metric Ref Use Iface 0.0.0.0 10.71.3.254 0.0.0.0 UG 1024 0 0 eth0 10.71.3.0 0.0.0.0 255.255.x.x U 0 0 0 eth0 [student@server01 Desktop]$ ifconfig |
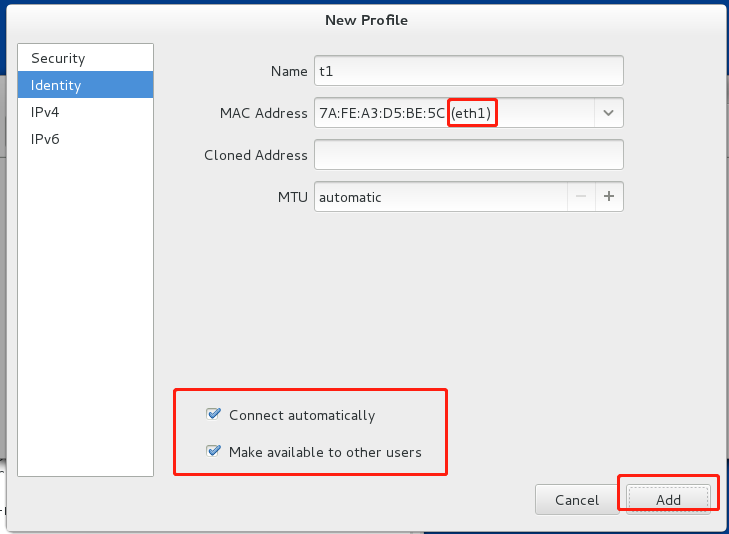
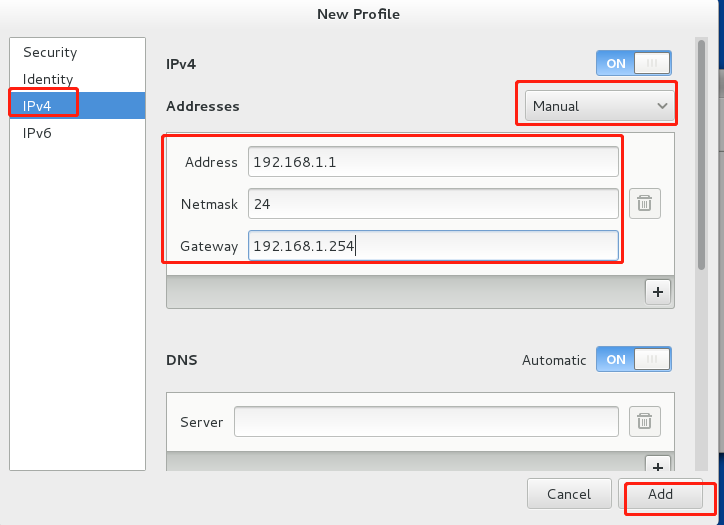
2.可以重新设置虚拟网络信息
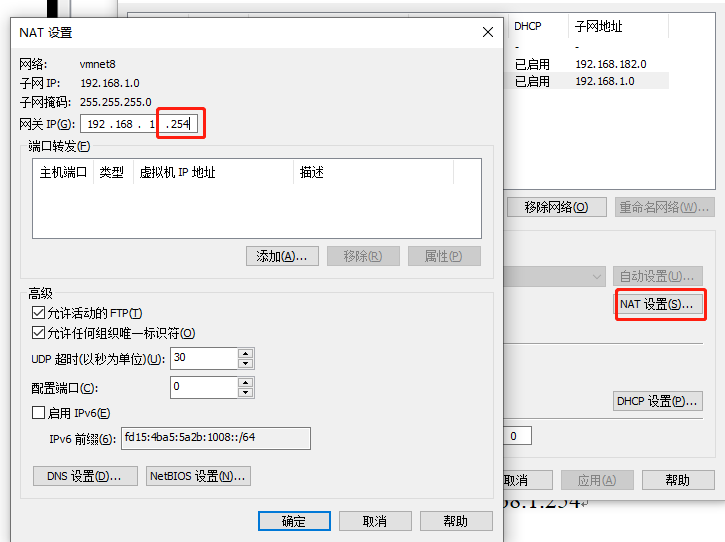
在VMwave中,设置虚拟网络信息
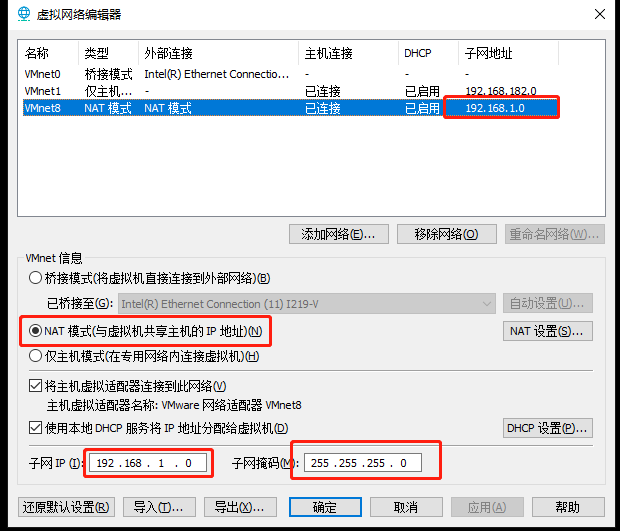
如设置成192.168.1.0字段,网关设成192.168.1.254
查看路由信息。发现路由表空白

目前没有网络
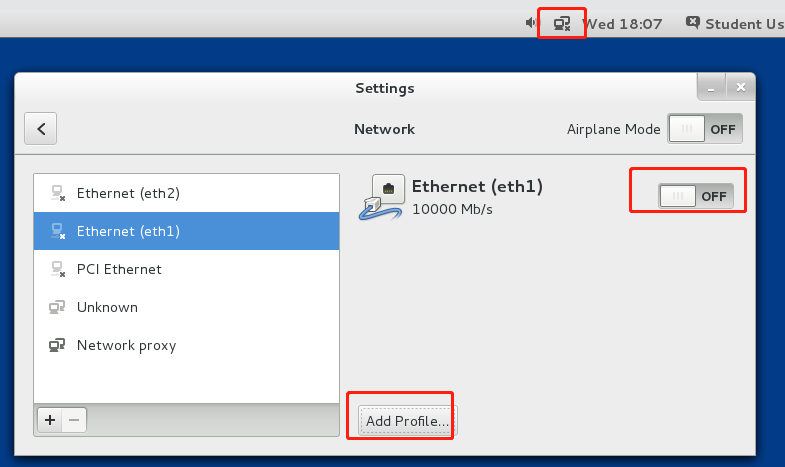
3 设置ssh免密登录
设置生成ssh
1)设置用户user1连接服务器的ssh
| [root@Server01 Desktop]# ssh user1@192.168.31.1 The authenticity of host '192.168.31.1 (192.168.31.1)' can't be established. ECDSA key fingerprint is eb:24:0e:07:96:26:b1:04:c2:37:0c:78:2d:bc:b0:08. Are you sure you want to continue connecting (yes/no)? y Please type 'yes' or 'no': yes Warning: Permanently added '192.168.31.1' (ECDSA) to the list of known hosts. user1@192.168.31.1's password: *** |
这个时候还没有设置ssh,所以无法免密登录,最终需要输入密码
生成ssh
| [root@Server01 user1]# ssh-keygen Generating public/private rsa key pair. Enter file in which to save the key (/root/.ssh/id_rsa): Enter passphrase (empty for no passphrase): Enter same passphrase again: Your identification has been saved in /root/.ssh/id_rsa. Your public key has been saved in /root/.ssh/id_rsa.pub. The key fingerprint is: c4:b1:2f:fa:b1:c1:88:25:c0:18:15:6d:a4:26:3a:65 root@Server01 The key's randomart image is: +--[ RSA 2048]----+ |
查看对钥
此时,ssh生成公钥和私钥,可以去文件里查看
| [root@Server01 user1]# cd ~ [root@Server01 ~]# cd .ssh [root@Server01 .ssh]# ls authorized_keys id_rsa id_rsa.pub known_hosts |
上传公钥
把公钥上传到服务器上
| [root@Server01 .ssh]# ssh-copy-id user1@192.168.31.1 /usr/bin/ssh-copy-id: INFO: attempting to log in with the new key(s), to filter out any that are already installed /usr/bin/ssh-copy-id: INFO: 1 key(s) remain to be installed -- if you are prompted now it is to install the new keys user1@192.168.31.1's password: ***;Number of key(s) added: 1 Now try logging into the machine, with: "ssh 'user1@192.168.31.1'" and check to make sure that only the key(s) you wanted were added. |
上传后,user1就可以免密码登录了
| [root@Server01 .ssh]# ssh user1@192.168.31.1 Last login: Thu May 26 18:05:45 2022 from 192.168.31.1 |
修改ssh默认端口
ssh默认是开启22号端口,但这样来说安全性会有影响。因此我们可以设置别的端口,关闭22号端口来增加安全性
- 修改配置文件
| [user1@Server01 ~]$ su root Password: ***;[root@Server01 user1]# cd /etc/ssh [root@Server01 ssh]# ls moduli sshd_config ssh_host_ecdsa_key.pub ssh_host_rsa_key.pub ssh_config ssh_host_ecdsa_key ssh_host_rsa_key [root@Server01 ssh]# vim sshd_config |
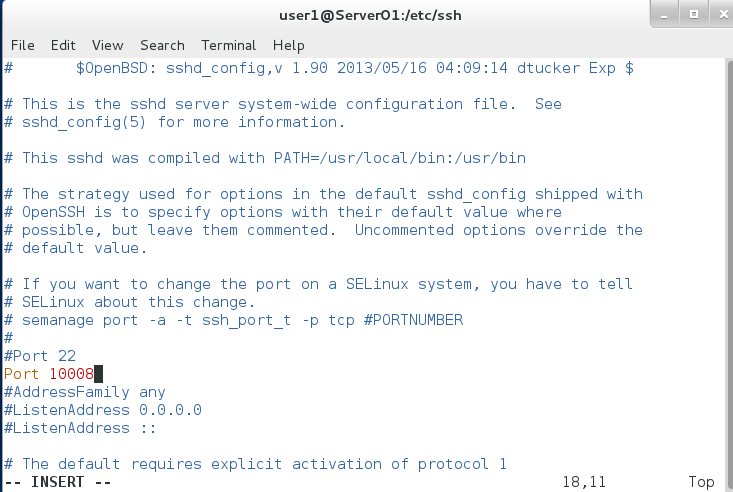
打开配置文件/etc/ssh/
设置一个端口10008,只要是没有被使用的端口都可以
查看ssh端口号
| [root@Server01 ssh]# semanage port -l |
-
设置SElinux
-
设置防火墙