202108《SpringBoot》学习笔记
狂神,B站,2021年8月
微服务阶段
整个Java学习路线
JavaSE:OOP、
MySQL:持久化
Html+css+js+jquery+框架:前端,视图,框架,css学不精通
JavaWeb:独立开发MVC三层架构的网站了,原始
SSM:框架,简化了我们的开发流程,配置开始较为复杂
War:tomcat运行
Spring再简化:SpringBoot,变成jar包,内嵌tomcat;微服务架构
服务越来越多,后面学SpringCloud,整理服务
阶段六:
SpringBoot-是什么-配置如何编写yaml-自动装配原理(重要,面试谈资)-集成web开发:业务核心-集成数据库druid-分布式开发:Dubbo与zookeeper-swagger:接口文档-任务调度-SpringSecurity:Shiro(6天)
SpringCloud-微服务-SpringCloud入门-Restful-Eureka-负载均衡Ribbon-Feign-HyStrix-Zuul路由网关-SpringCloud config:git(2天半)
Linux:2天
JVM机制:2天
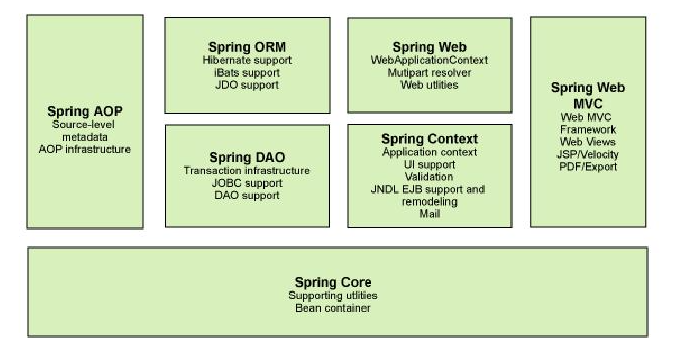 基础是为了以后看源码方便
框架是为了整合更简约
PS:从这里的第一次课老师介绍可以听出,他(狂神)仅是培训机构的一员培训师,而非网上所传的那些。(原话:在我没来之前,去年那个老师讲的深度……)。总结而言:培训机构为了打造所谓的名人、大牛,肆意造假编故事坑蒙学员。而且在这节课的介绍中,也是一个套路,说他的课怎么好,加了什么好的内容,别的老师、机构不负责任……
基础是为了以后看源码方便
框架是为了整合更简约
PS:从这里的第一次课老师介绍可以听出,他(狂神)仅是培训机构的一员培训师,而非网上所传的那些。(原话:在我没来之前,去年那个老师讲的深度……)。总结而言:培训机构为了打造所谓的名人、大牛,肆意造假编故事坑蒙学员。而且在这节课的介绍中,也是一个套路,说他的课怎么好,加了什么好的内容,别的老师、机构不负责任……
1.什么是Spring?
老师: 培训讲师:面向面试培训,教你如何使用,快速上手。 做教育的:如何学习新东西,如何持续学习,如何关注这个行业;来龙去脉,历史,理论,谈资 SpringBoot就是一个JavaWeb的开发框架,简化开发,约定大于配置,you can “just run” Java企业级应用-J2EE-Spring-SpringBoot的过程 SpringBoot的主要优点: 1.为所有Spring开发者更快的入门 2.开箱即用,提供各种默认配置来简化项目配置 3.内嵌式容器,简化web项目 4.没有冗余代码生成和xml配置的要求 程序=数据结构+算法(集合框架),程序猿:创造性 程序=面向对象+框架,码农:重复性
2.什么是微服务
MVC三层结构,MVVM,微服务架构 业务:service,userService-模块 Springmvc,controller 提供接口
04113.第一个SpringBoot程序
Jdk1.8 Maven 3.6.1 Springboot:最新版 Idea 官方:提供了一个快速生成的网站,idea集成了这个网站 可以直接在官网下载,导入idea开发 直接使用idea创建一个springboot项目 Springboot banner工具生成特殊文本
4.SpringBoot自动装配原理
1.自动配置 Pom.xml Spring-boot-dependencies:核心依赖在父工程中 我们在写或引入SpringBoot依赖的时候,不需要指定版本,因为有版本仓库 启动器:SpringBoot的启动场景
<dependency>**

**<groupId>org.springframework.boot</groupId>**

**<artifactId>spring-boot-starter</artifactId>**

</dependency>
如spring-boot-starter-web,会自动导入web环境所有的依赖 Springboot会将所有的功能场景都变成一个个的启动器 如果需要使用什么功能,只需要找到一个个的启动器 主程序
**package** com.fei;

**import** org.springframework.boot.SpringApplication;

**import** org.springframework.boot.autoconfigure.SpringBootApplication;

//SpringBootApplication :标注这个类是一个SpringBoot的应用

@SpringBootApplication(scanBasePackages = "fei")

**public** **class** Springboot01HelloworldApplication {

**public** **static** **void** main(String[] args) {

SpringApplication.run(Springboot01HelloworldApplication.**class**, args);

}

}
Springboot的所有自动配置都是在启动的时候扫描并加载的,但是不一定生效,要判断条件是否成立 。需要导入相应的start 1.springboot在启动时,从类路径下获取指定的值 2.将这些自动配置类导入容器,自动配置就会生效 3.springboot会将所有需要导入的组合,以类名的方式导入 4.有了自动配置类,免去了手动编写代码 关于SpringBoot:自动装配、run
5.SpringBoot配置
注意:SpringBoot生成的自带class:application要在其他包的前端,否则会出现赋值为null的情况 Application.yaml
person:

name: xiaofei${random.int}

age: ${random.int(30)}

birth: 1990-4-1

happy: true

maps: {k1:v2 , k2:v2}

lists:

- code

- music

- girl

dog:

name: ${person.hello:hello}_旺财

age: 3
Person代码
package com.example.pojo;

import org.springframework.beans.factory.annotation.Autowired;

import org.springframework.beans.factory.annotation.Value;

import org.springframework.boot.context.properties.ConfigurationProperties;

import org.springframework.context.annotation.PropertySource;

import org.springframework.stereotype.Component;

import java.util.Date;

import java.util.List;

import java.util.Map;

// 加载指定的配置文件

@PropertySource(value = "classpath:application.properties")

@Component

@ConfigurationProperties(prefix = "person")

public class Person {

//spel表达式取出配置文件的值

@Value("${name}")

private String name;

private Integer age;

private Boolean happy;

private Date bitrh;

private Map<String,Object> maps;

private List<Object> lists;

private Dog dog;

public Person() {

}

public Person(String name, Integer age, Boolean happy, Date bitrh, Map<String, Object> maps, List<Object> lists, Dog dog) {

this.name = name;

this.age = age;

this.happy = happy;

this.bitrh = bitrh;

this.maps = maps;

this.lists = lists;

this.dog = dog;

}

public String getName() {

return name;

}

public void setName(String name) {

this.name = name;

}

public Integer getAge() {

return age;

}

public void setAge(Integer age) {

this.age = age;

}

public Boolean getHappy() {

return happy;

}

public void setHappy(Boolean happy) {

this.happy = happy;

}

public Date getBitrh() {

return bitrh;

}

public void setBitrh(Date bitrh) {

this.bitrh = bitrh;

}

public Map<String, Object> getMaps() {

return maps;

}

public void setMaps(Map<String, Object> maps) {

this.maps = maps;

}

public List<Object> getLists() {

return lists;

}

public void setLists(List<Object> lists) {

this.lists = lists;

}

public Dog getDog() {

return dog;

}

public void setDog(Dog dog) {

this.dog = dog;

}

@Override

public String toString() {

return "Person{" +

"name='" + name + '\'' +

", age=" + age +

", happy=" + happy +

", bitrh=" + bitrh +

", maps=" + maps +

", lists=" + lists +

", dog=" + dog +

'}';

}

}
测试代码
package com.example;

import com.example.pojo.Dog;

import com.example.pojo.Person;

import org.junit.jupiter.api.Test;

import org.springframework.beans.factory.annotation.Autowired;

import org.springframework.boot.test.context.SpringBootTest;

@SpringBootTest

class Springboot02ConfigApplicationTests {

@Autowired

private Person person;

@Test

void contextLoads() {

System.out.println(person);

}

}
JRS303校验
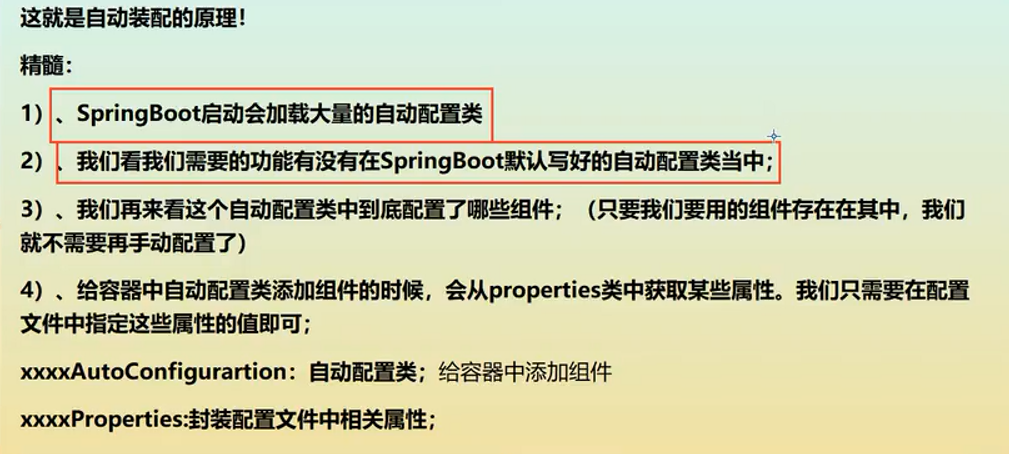 可以通过debug=true来判断哪些class没有生效
SpringBoot Web开发
自动装配 Springboot到底帮我们配置了什么?我们能不能进行修改?能修改哪些东西?能不能扩展? XxxxAutoConfiguration,向容器中自动配置组件 XxxProperties:自动配置类,装配配置文件中自定义的一些内容 要解决的问题: 导入静态资源 首页 Jsp,模板引擎Thymeleaf 装配扩展SpringMVC 增删改查 拦截器 国际化
静态资源
1.在springboot中,我们可以使用以下方式处理静态资源 Webjars, localhost:8080/webjars/ Public,static,/**,resourcesn localhost:8080/ 2.优先级:resources>static()>public
首页如何定制
模板引擎
前端交给我们的页面,是html页面。如果是我们以前开发,我们需要把他们转成jsp页面,jsp好处就是当我们查出一些数据转发到JSP页面以后,我们可以用jsp轻松实现数据的显示,及交互等。jsp支持非常强大的功能,包括能写Java代码,但是呢,我们现在的这种情况SpringBoot这个项目首先是以jar的方式,不是war,像第二,我们用的还是嵌入式的Tomcat,所以呢,他现在默认是不支持jsp的。 那不支持jsp,如果我们直接用纯静态页面的方式,那给我们开发会带来非常大的麻烦,那怎么办呢,SpringBoot推荐你可以来使用模板引擎。那么这模板引擎,我们其实大家听到很多,其实jsp就是一个模板引擎,还有以用的比较多的freemarker,包括SpringBoot给我们推荐的Thymeleaf,模板引擎有非常多,但再多的模板引擎,他们的思想都是一样的,什么样一个思想呢我们来看一下这张图。
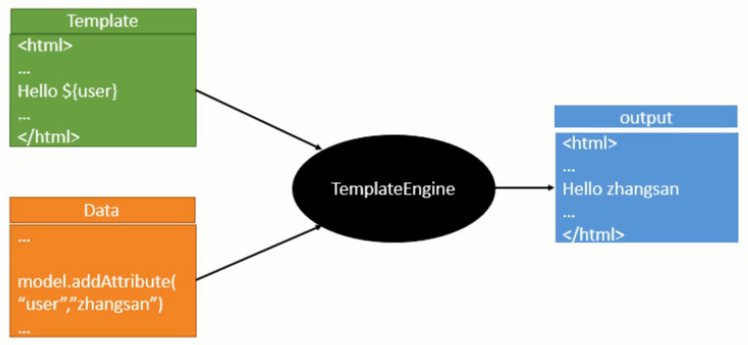 模板引擎的作用是写一个页面模板,比如有些值是动态的,可以写成是一个表达式。而这个值可以根据组装的数据来找到,然后把这个模板和数据交给模板引擎,它会按照数据解析表达式、填充到指定位置,然后生成最终的内容。
SpringBoot推荐Thymeleaf模板引擎,是一个高级语言的模板引擎,语法简单,功能强大。
使用thymeleaf,只需要导入相应的依赖便可
模板引擎的作用是写一个页面模板,比如有些值是动态的,可以写成是一个表达式。而这个值可以根据组装的数据来找到,然后把这个模板和数据交给模板引擎,它会按照数据解析表达式、填充到指定位置,然后生成最终的内容。
SpringBoot推荐Thymeleaf模板引擎,是一个高级语言的模板引擎,语法简单,功能强大。
使用thymeleaf,只需要导入相应的依赖便可
<dependency>

<groupId>org.thymeleaf</groupId>

<artifactId>thymeleaf-spring5</artifactId>

</dependency>

<dependency>

<groupId>org.thymeleaf.extras</groupId>

<artifactId>thymeleaf-extras-java8time</artifactId>

</dependency>
将html放到templates目录下即可
员工管理系统
POJO模块
Department代码
- ``` package spring02web.pojo;
import lombok.AllArgsConstructor;
import lombok.Data;
import lombok.NoArgsConstructor;
//部门表
@Data
@AllArgsConstructor
@NoArgsConstructor
public class Department {
private Integer id;
private String departmentName;
} ```
Employee代码
- ``` package spring02web.pojo;
import lombok.Data;
import lombok.NoArgsConstructor;
import java.util.Date;
//员工表
@Data
@NoArgsConstructor
public class Employee {
   private Integer id;

   private String lastName;

   private String email;

   private Integer gender; //0:女 1:男

   private Department department;

   private Date birth;

   public Employee(Integer id, String lastName, String email, Integer gender, Department department) {

       this.id = id;

       this.lastName = lastName;

       this.email = email;

       this.gender = gender;

       this.department = department;

       this.birth = new Date(); //默认的创建日期
}
} ```
Dao模块
DepartmentDao代码
package spring02web.dao;

import spring02web.pojo.Department;

import org.springframework.stereotype.Repository;

import java.util.Collection;

import java.util.HashMap;

import java.util.Map;

//部门dao

@Repository

public class DepartmentDao {

//模拟数据库中的数据

private static Map<Integer, Department> departments = null;

static{

    departments = new HashMap<Integer,Department>();

    departments.put(101,new Department(101,"教学部"));

    departments.put(102,new Department(102,"市场部"));

    departments.put(103,new Department(103,"教研部"));

    departments.put(104,new Department(104,"运营部"));

    departments.put(105,new Department(105,"后勤部"));

}

//获得所有部门信息

public Collection<Department> getDepartment(){

    return departments.values();

}

//通过id获得部门

public Department getDepartmentById(Integer id){

    return departments.get(id);

}

}
EmpolyeeDao
package spring02web.dao;

import spring02web.pojo.Department;

import spring02web.pojo.Employee;

import org.springframework.beans.factory.annotation.Autowired;

import java.util.Collection;

import java.util.HashMap;

import java.util.Map;

//员工Dao

public class EmployeeDao {

//模拟数据库中的数据

private static Map<Integer, Employee> employees = null;

//员工所属部门

@Autowired

private DepartmentDao departmentDao;

static {

employees = new HashMap<Integer, Employee>();//创建一个部门表

employees.put(1001,new Employee(1001,"张三","4***@qq.com",1,new Department(101,"教育部")));

employees.put(1002,new Employee(1002,"李四","4***@qq.com",0,new Department(101,"教育部")));

employees.put(1003,new Employee(1003,"张四","4***@qq.com",1,new Department(103,"教研部")));

employees.put(1004,new Employee(1004,"张五","4***@qq.com",0,new Department(102,"市场部")));

employees.put(1005,new Employee(1005,"李六","4***@qq.com",1,new Department(101,"教育部")));

}

//主键自增

private static Integer initId = 1006;

//增加一个员工

public void save(Employee employee){

if (employee.getId() == null){

employee.setId(initId++);

}

employee.setDepartment(departmentDao.getDepartmentById(employee.getDepartment().getId()));

employees.put(employee.getId(),employee);

}

//查询全部员工信息

public Collection<Employee> getAll(){

return employees.values();

}

//通过id查询员工

public Employee getEmployeeById(Integer id){

return employees.get(id);

}

//通过id删除员工

public void delete(Integer id){

employees.remove(id);

}

}
Controller模块
IndexController代码
package spring02web.controller;

import org.springframework.stereotype.Controller;

import org.springframework.web.bind.annotation.RequestMapping;

@Controller

public class IndexController {

@RequestMapping({"/","/index.html"})

public String index(){

return "index";

}

}

<dependency>

<groupId>org.springframework.boot</groupId>

<artifactId>spring-boot-starter-thymeleaf</artifactId>

</dependency>
如何写一个网站
1.前端: 模板:别人写好的,我们拿来自己修改 框架:组件,自己手动组合拼接,Bootsrap,Layui,semanti-ui 栅格系统,导航栏,侧边栏, 2.设计数据库(数据库设计) 3.前端自动运行,独立化工程 4.数据接口对口对接:json,对象,all in one 5.前后端联调测试 1.要有一套自己熟悉的后台模板,x-admin,bootstrap 2.前端界面:至少自己能够通过前端框架,组合出来一个网站页面
- index
- about
- blog
- post
user 3.能够让网站自己独立运行
SpringBoot项目课程
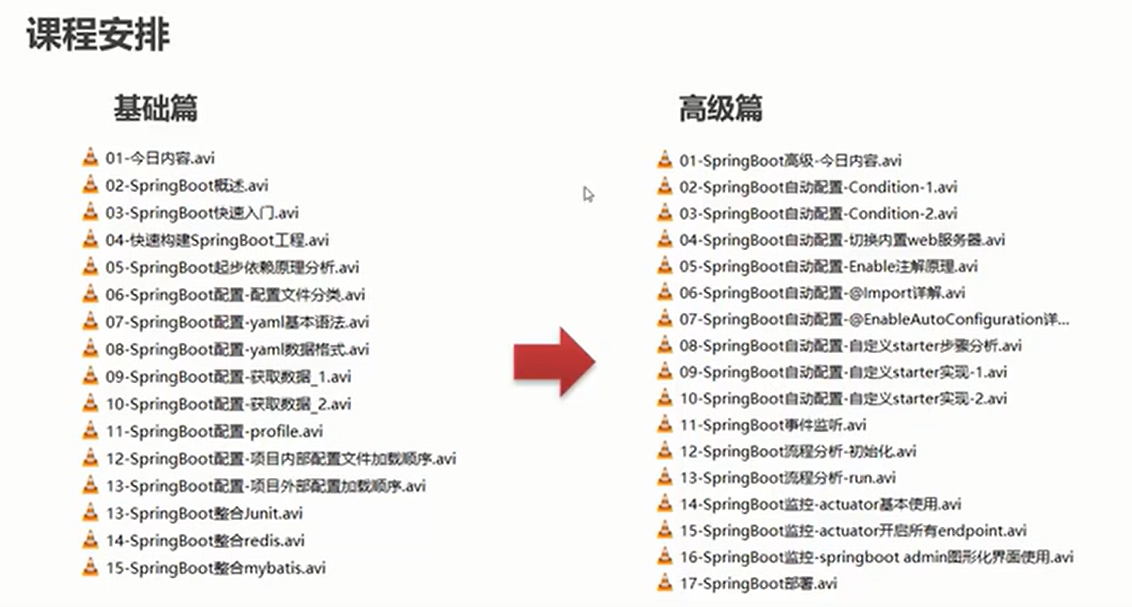
B站,黑马程序员 前期Spring,SpringMVC,MyBatis 后期Spring Cloud,各种解决方案
SpringBoot概述
快速使用Spring的方式,约定优于配置
Spring缺点
1.配置繁琐 2.依赖繁琐
Spring功能
1.自动配置 2.起步依赖 定义了其他库的传递依赖 3.辅助功能 提供了大型项目中常见的非功能性特性,如嵌入式服务器、安全、健康检测 SpringBoot并不是对Spring项目的功能增强,而是提供快速开发
SpringBoot快速入门
案例:需求
搭建SpringBoot工程,定义HelloController.hello()方法
步骤:
1.创建Maven项目 2.导入SpringBoot起步依赖
<!-- springboot工程需要继承的父工程 -->

<parent>

<artifactId>spring-boot-starter-parent</artifactId>

<groupId>org.springframework.boot</groupId>

<version>2.5.2</version>

</parent>

<dependencies>

<dependency>

<groupId>org.springframework.boot</groupId>

<artifactId>spring-boot-starter-web</artifactId>

</dependency>

</dependencies>
3.定义Controller
package com.controller;

import org.springframework.web.bind.annotation.RequestMapping;

import org.springframework.web.bind.annotation.RestController;

@RestController

public class HelloController {

@RequestMapping("/hello")

public String hello(){

return "hello Spring Boot";

}

}
4.编写引导类
package com;

import org.springframework.boot.SpringApplication;

import org.springframework.boot.autoconfigure.SpringBootApplication;

//引导类。理解为SpringBoot项目的入口

@SpringBootApplication

public class HelloApplication {

public static void main(String[] args) {

SpringApplication.run(HelloApplication.class,args);

}

}
5.启动测试
小结
SpringBoot在创建项目时,使用jar的打包方式 SpringBoot的引导类,是项目入口 ,运行main方法就可以启动项目 使用SpringBoot和Spring构建的项目,业务代码编写方式完全一样 方法二:直接通过IDEA构建 方法三:通过网址start.spring.io 或start.aliyun.io构建
SpringBoot起步依赖原理分析
起步依赖原理分析
(1)在Spring-boot-parent中定义了各种技术的版本信息,组合了一套最优搭建的技术版本 (2)在各种starter中,定义了完成该功能需要的坐标合集,其中大部分版本信息来自于父工程 (3)我们的工程继承parent,引入starter后,通过依赖传递,就可以简单方便获得需要的jar包,并且不会存在版本冲突等问题
SpringBoot配置
配置文件分类
SpringBoot是基于约定的,所以很多配置都有默认值,如果想要自己配置,可以使用application.properties或application.yaml(yml)进行配置 默认配置文件名称:application Properties:
Server.port=8080 Yml: Server: Port: 8080 //注意要冒号后加空格 如果在同一级目录配置了这3个文件,则加载顺序为:peoperties->yml->yaml
Yaml
一、概述 YAML Ain’t Markup Language,是一种直观的能够被电脑识别的数据序列化格式语言 Yaml文件是以数据为核心,比传统的xml方式更加简洁 Yaml文件的扩展名可以使用.yaml或.yml
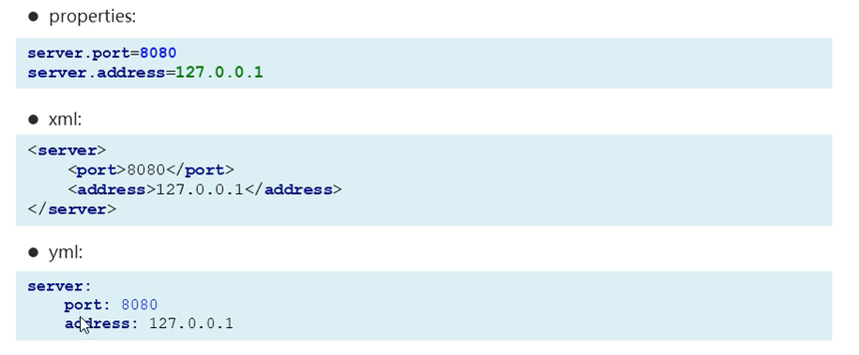
因此,yaml简洁,以数据为核心 二、基本语法: 1.大小写敏感 2.数据值前边必须有空格,作为分隔符 3.使用缩进符表示层级关系 4.缩进时不允许使用Tab键,只允许使用空格(各个系统Tab对应的空格数目不同,导致层次混乱) 5.缩进的空格数目不重要,只要相同层级的元素左侧对齐 6.# 表示注释 三、数据格式 1.对象(map):键值对的集合

空格不要忘记 2.数值:一组按次序排列的值

3.纯量:单个的、不可再分的值
 四、参数引用
${key}
Application.yml
四、参数引用
${key}
Application.yml
server:
port: 8081
name: abc
对象格式
person:
name: zhangsan
age: 20
对象的行内写法
person2: {name: zhangsan, age: 20}
数组
address:
  - beijing
  - shanghai
数组的行内写法
address2: [beijing,shanghai]
纯量
msg1: 'hello \n world' # 不会识别转义字符,原样输出
msg2: "hello \n world" # 能识别转义字符
读取配置文件内容
@value

Environment

@ConfigurationProperties
在pom.xml中加入

<dependency>

<groupId>org.springframework.boot</groupId>

<artifactId>spring-boot-configuration-processor</artifactId>

<optional>true</optional>

</dependency>
能够取消代码过程中顶行的红色提醒,也能在yml提示相应信息 Controller中Person代码
package com.controller;

import org.springframework.boot.context.properties.ConfigurationProperties;

import org.springframework.stereotype.Component;

import java.util.Arrays;

@Component

@ConfigurationProperties(prefix = "person")

public class Person {

private String name;

private int age;

private String[] address;

public String getName() {

return name;

}

public void setName(String name) {

this.name = name;

}

public int getAge() {

return age;

}

public void setAge(int age) {

this.age = age;

}

public String[] getAddress() {

return address;

}

public void setAddress(String[] address) {

this.address = address;

}

@Override

public String toString() {

return "Person{" +

"name='" + name + '\'' +

", age=" + age +

'}';

}

}
Controller中HelloController代码
package com.controller;

import org.springframework.beans.factory.annotation.Autowired;

import org.springframework.beans.factory.annotation.Value;

import org.springframework.core.env.Environment;

import org.springframework.web.bind.annotation.RequestMapping;

import org.springframework.web.bind.annotation.RestController;

@RestController

public class HelloController {

@Value("${name}")

private String name;

@Value("${person.name}")

private String personName;

@Value("${person.age}")

private int age;

@Value("${address[0]}")

private String address;

@Value("${msg1}")

private String msg1;

@Value("${msg2}")

private String msg2;

@Autowired

private Environment env;

@Autowired

private Person person;

@RequestMapping("/hello")

public String helloName(){

System.out.println(name);

System.out.println(personName);

System.out.println(age);

System.out.println(address);

System.out.println(msg1);

System.out.println(msg2);

System.out.println("---------------------------");

System.out.println(env.getProperty("person.name"));

System.out.println(env.getProperty("address[0]"));

System.out.println("---------------------------");

System.out.println(person);

String[] address = person.getAddress();

for (String s : address) {

System.out.println(s);

}

return "hello spring boot name!";

}

@RequestMapping("")

public String hello(){

return "hello spring boot 222!";

}

}
Profile
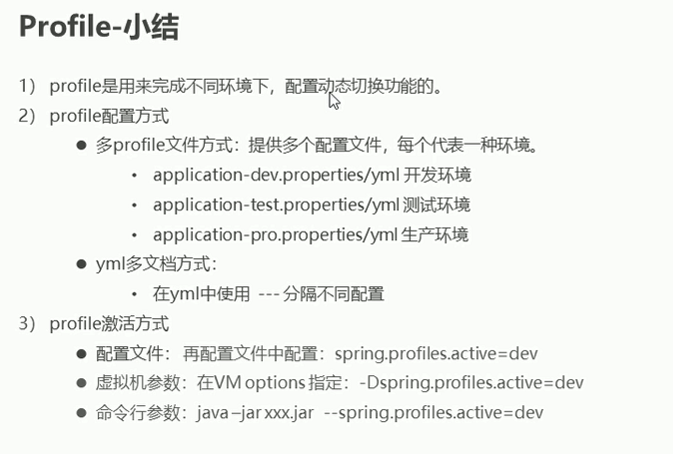
我们在开发SpringBoot应用时,通常同一套程序会被安装到不同环境,比如:开发、测试、生产等。其中数据库地址、服务器端口等配置都不同时,如果每次打包都要修改配置文件,则非常麻烦。Profile功能就是来进行动态配置切换的 1)profile配置方式
- 多profile文件方式
- yml多文档方式
--

server:

port: 8081

spring:

profiles: dev

--

server:

port: 8082

spring:

profiles: test

--

server:

port: 8083

spring:

profiles: pro

--

spring:

profiles:

active: pro
2)profile激活方式
-
配置文件
-
虚拟机参数
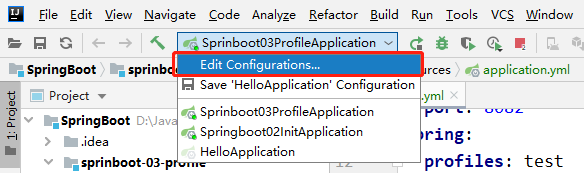
- Dspring.profiles.active=test
- 命令行参数
- -spring.profiles.active=pro
内部配置加载顺序
外部配置加载顺序
SpringBoot整合其他框架